7/31/2011

Lot of flowers to stitch...

Hello cyber travelers,


No new embroidery to show but I'd like to share the visit I enjoyed yesterday in Claude Monet 's garden in Giverny.


Incredible flowers, wonderful light, moments of pure bliss.


Enjoy,
Virginie


6/18/2011

Old CD and DVD = embroidered scissor case !


Hello

I was fed up to see old unused CD and DVD scattered around the house. So running through the web I discovered this place :
Funny,  but it gave me another idea to recycle my old CD. A scissor case ! 
I missed my mother birthday, June, 1th, so it would be the perfect gift from a stitcher to another stitcher and from a daughter to her beloved mother.


I choose in my huuuuuge stash  : 4 pieces of "soie sauvage" : 2 deep red and 2 old looking gold, 2 pieces of felt, a cardboard piece, a red organza ribbon about 1,5", golden beads, silk threads, metallic threads, 4 used CD, some glue, 12 skillful fingers, gallons of fresh tea and nerves of steel (french idioms translated)... I needed them, because, old habits die hard, I stitched the whole thing the day before offering it to my mother and finished around 3:00 PM. Arrrrghhh ..... it sooooo me !


Sorry for the bad pictures. I took them with my Iphone.


See the top. I embroidered my mother initial, M for Monique in fly stitch using a wonderful hand dyed silk, I guess it is one of the Thread Gatherer, but I have lost the tag.


Under the unitial, I stitched A rose and its buds in bullions  with AVAS  silks. 
These bullions are quite a challenge. They slipped, they twisted, they have their own life which doesn't include mine !!


See the bottom. I used 2 AVAS silk thread strands with one metallic strand : Bijoux from Access commodity. I stitched now and then following my imagination. 


The opened scissor case. Dues to lack of time, I didn't stitch anything inside where I would have put some flowers and beads. The scissors (Bohin a french company)  are lonely but very nice and sharp. We can't see it, but they are red, green and gold.


Below, you'll be able to see some close up and how I managed to make the scissor case.


For fun, the tutorial :

The felt glued to a cardboard then to the CD


I cut the embroidered piece of silk without any "finesse". I am an embroiderer, remember  ? not a good sewer nor craftsman (woman ?)


I run a thread around and ...


... simply pull the thread. Be serious, I just have made a knot ? 


Then I put some fabric glue on the 2 covered CD and stuck them together. Before stucking them I have put the organza ribbon between the 2 CD. It will be used to make a nice knot in order to close the scissor case.


And I sew the edges with the metallic thread. Please note it is around 1:00 in the morning and I am tired and fairly crancky. Fortunately, the whole house is sleeping and didn't heard the insults I mumble.


Because I am addicted to beads, I stitch golden beads at regular (hummmmm) spaces.


VOILA !!!! 

It is nearly 3:00 in the morning, my eyes and fingers are sore, my insults directory is complete, but I am happy to have be able to turn old unused stuff in a nice looking gift for my mother.

Needless to say she was delighted with her scissor case.


1/11/2011

Needlepoint, I love it !

Hi, did you have a nice day ? Mine was exhausting... but I have a little story to tell and some pictures to show. It is perfect to relax... So...

When I was young my grand-mother used to  bought me a little canevas (french type, kind of  printed canvas) to entertain me during holidays. I guess it was my first encounter with needlework and I became addicted. I moved to cross stitch for a long period, then I discovered "Embroiderers' Guild of America and American Needlepoint Guild. I was toasted !!!!

Last year, during "L'aiguille en fête" a french needlework show, I met Annick Latourelle, a french needlepoint designer who gets inspirations from geometric shapes. See her website (scroll down the page and click on the british flag to the english version :

http://www.annicklatourelle.com

I have bought and stitched "Sahara". The first picture shows the whole piece, and the others pictures point some details.


I really enjoyed to stitch this design. The colors are vibrants, the different stitches are challenging and it was relatively quick to stitch. Perfect for a girl like me.

Bye for now

Virginie

1/06/2011

Huge mistake on Angelina GCC ! arrgh....


Hi cyber travelers and friends,

I was working with great pleasure on "Angelina" from Barbara Kershaw I met in Pittsburgh at National seminar, because we were in the same 4 days class about whitework (again).

So I started the cutting session for the first band in needleweaving, and boom !! I cut as well a second band instead to leave thread for "Principessa stitch".

See :


What am I doing now ? Needleweving the 2 bands and add "Principessa band after" ? It will look odd.

I you have any idea, please let me know. I am a little lost here.

Have a nice evening. It is 09:30 PM here and I think I will head to bed and forget about it.

Virginie

12/31/2010

I'm back ... yipeee !


Hi to you cyber travelers

Sorry for not having updated this blog (I guess it is the understatement of the year considering the date of my last message ;-) but to be really honest, I had lost my blog address. Dumb me !!!

I have a french blog, remember french girl here, that I update poorly too.
My first goal for 2011 will be updating "this" blog regularly with my embroideries, as well tips and hints, and stuff I find on the web.
In one word : sharing. My favorite thing to do.

I apologize in advance for my english language and my mistakes, but as we said in France "nobody is perfect, what is important is improving" (or something like that).

To start my new resolution, I am going to show you my last goldwork embroidery. It is a piece taught by my Luneville embroidery teacher. Remember Luneville embroidery in beading tambour work in english.

See this beauty called "Indian flower". I used gold flat spangles, gold bright check purl, gold smooth purl, real gold thread and rayon thread.

These pictures below show you some details. The red french knots are stitched with a french rayon thread (professionals embroiderers use them a lot for the light effect). They are completed by detached chain stitches using gold bright check purl.

The flower 's center is stitched in 2 steps. First laying gold thread and fixing them on the fabric with tiny cross stitches. Second, I surrounded the center with pieces of smooth purl using stem stitch.


My instructor taught me 3 ways to do stem stitch according to the effect I wish. I have made a little lesson in stem stitches. I hope it will help. See below...
This last picture shows the leaves using real gold thread (a little tricky to stitch) in satin stitch, and the leaves using Rayon thread. The flower 's calyx is also stitched with the gold thread but using "kind of" long and short stitches. I say "kind of" because on the picture, it is not very obvious.


Ok, that's all for now, but I'll be back soon with lots of pictures.
see you

Virginie


9/19/2008

Orchid in Lunéville embroidery

Hello,

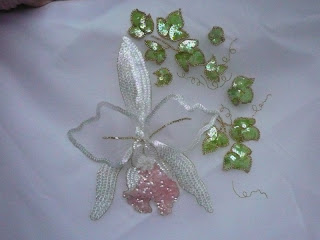
My last embroidery piece achieves my luneville Embroideries' courses. This is an orchid embroidered in "stumpwork" style.


I have worked on two different frames.
On the first one, which was the main support (white silk organza), I have stiched the 3 white main petals with white transluscent splangles called in french "paillettes soleil" because of the form, see :


Then, I have stiched 5 green leaves in green flat spangles surrounded with golden beads.

See the green flat spangles


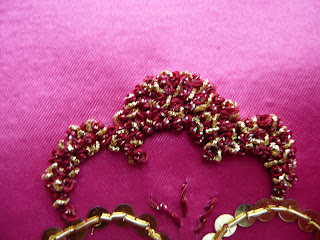
And the golden beads


I have stitched too on this frame the golden stems with beads and and golden thread called in french "fil lurex" which is like a very, very fine japanese golden thread.

On a second frame, I stitched 6 green leaves and the 2 white horizontal petals on white silk organza too strengthened with wire. The petals are surrounded with the "paillettes soleil" I already used. The veins in center are stiched with golden tubes. see here :


I stiched too the rose petal with rose curved spangles and some white transluscent curved spangles. see the rose spangles :

and the white one :


Then, I have cut the fabric (arrrgghh !) and attached the 2 petals on the main fabric in the center. I gave a form with my fingers and raised the petals.
I have cut the rose and white petal, as well the 6 green leaves, and in the same kind I have attached them on the main fabric with tiny stiches. I have modeled the raised pieces with my fingers and fixed them always with invisible tiny stiches.

Finally, I add for the heart, transparent beads an "paillettes soleil" stitched raised to give enhancement.

I positively love this orchid. It was designed by my instructor Carole Magne. I'll frame it (the orchid not Carole ;-)) in order to have it under my eyes whenever I want.

See you soon

Virginie

8/17/2008

Chain stich in Tambour work

Here are pictures from a french book in order to help to understand the basic chain stich in tambour work.

First of all, you have to strech very tighly the fabric on a frame, or a tambour leaving both hands available.

Then use a tambour hook like one of these (my personnal mini collection ;-)


And go on...

Keep something in mind : you have to rotate the hook to keep the thread attached.


Phase 1 :
Insert the hook through the fabric to the back of the frame with the right hand. in the main time the thread is held in the left hand underneath the fabric (do a knot like on the picture)


Phase 2 :
Catch the thread on the hook

Phase 3 :
Bring it through to the front without letting go the thread in your left hand


Phase 4 :
Rotate the hook 180°

Phase 5 :
Insert the hook a short distance ahead and on the stich line. Keep your stitch the same size


Phase 6 :
Put the thread around the hook


Phase 7:
A complete turn around the hook


Phase 8 :
Turn the hook 180 ° counter clockwise
Phase 9 :
Bring the hook up to he top of fabric


Phase 10 :
While keeping the thread slightly straight


Phase 11 :
Rotate the hook 180 ° clockwise
Phase 12 :
Insert the hook again a short distance ahead

Phase 13
Roll again a full loop around the hook and start again from phase 7.


In France, this is called "Point de Beauvais".

Enjoy !!